Monday, November 19, 2012

Victoria's Secret Ultimate Makeup Kit : Swatch & Review

Growing up in the '90s, I remember seeing a lot of makeup palettes that were sort of ubiquitous at the time. I don't remember the brand but it was usually encased in a black plastic container. The container's design ranges from simple to creative ones such as in the shape of nautilus, with a single pull-out palette to a more elaborate ones with multiple palettes that pull out or swivel. The many colors made for very interesting visuals.

Those palettes may have long gone but the fascinations continue, though. It's why palettes like ones from 88 Coastal Scents or ones that come out during Holiday Season from Sephora have become very popular.

Today I'm gonna review one from Victoria's Secret. It's called Ultimate Makeup Kit and I am very pleased with its quality given the price. It's from Victoria's Secret VS Makeup line and I bought this a little over a year ago, I think. It actually came with a cardboard box with Adrianna Lima's face on it but I discarded it a long time ago. I believe Victoria's Secret doesn't produce this exact same product anymore but they always have a makeup kit containing exactly the same thing that they launch every season in different packaging.

The kit comes in a compact black plastic box with smooth and shiny finish. The dimensions of the box when fully closed is 5.6"(L)x4.3"(W)x1.2"(H).
It opens up to two Silky Eyeshadow palettes that contain 15 shades each. The palettes slide to the side, revealing the Perfect lipstick and lip gloss palette. The lip glosses are on the left while the lipsticks are on the right hand side. Next to the lip palette is where the applicators, eye liner, lip liner, and mascara are stashed. There's another palette underneath that pulls out. This palette contains 4 blushes, a bronzer, and two kinds of powder.


All the makeup are made in USA except mascara, lip liner, and eye liner (Made in Italy) and the applicators and container (Made in China). I'd say for SGD45, that's not too shabby. Do you realize that nowadays big name brands would launch special limited editions palette during holidays in such cheap price but they'd all be made in China? I hate it when they do that, such a rip-off.


Now, for the swatches I'm gonna start with the eye shadows first, then the lip palette followed by the blushes and powders. Enjoy!

Silky Eye Shadows

  
ROW 1
 ROW 2
 ROW 3
 ROW 4
 ROW 5
The eye shadows really are silky and with the exception of the matte ones, they have a slight sheen that make them look very modern. They are all pigmented but not as pigmented as say, Urban Decay's so it's more foolproof and easier to blend or mix 'n match.

Perfect Lipstick & Lip Gloss
Left:Glosses, Right:Lipsticks


The lipsticks and glosses are very moisturizing but the color can be a little too sheer at times. It also has poor staying power and the glosses seem to dilute the lipstick color when applied on top of it and the pigment can settle into the creases. Can't say much about the eye liner or the lip liner, they come in the shape of tiny pencils that's a little over 2" long, very hard to control.

Blushes & Powders


Number 1 is the only matte color in the bunch. Numbers 2 & 3 contain the most glitters while number 4 is somewhere in between. Number 5 is called 'Luminous Powder', I think it's supposed to give some glamorous finishing touch. Number 6 is called 'Translucent Powder', it gives a nice sheen to the skin but it looks like it's only suitable for fair-skinned girls, not sure how it would turn up on dark-skinned girls. The bronzer is quite sheer so it's buildable depending on what effect you aim for, it also has a nice sheen to highlight your features.

The kit also includes a mini mascara which has apparently dried up. I don't like to use mini mascara anyway because it's hard to control the wand but if you're wondering, here's how the mascara looks when applied. 2 coats, no curler.

Here I've included a few look books using the VS Ultimate Makeup Kit for your reference as well:


 And a couple of look books using the lip palette:

So in conclusion, this palette is definitely worth it and I totally recommend this one if you're planning to get a palette to complete your cosmetics vocabulary. This palette offers variety of colors with modern finish and the colors (including the lip products and the blushes) are totally wearable, they are buildable so you can adjust the intensity of the color. This palette (different packaging, same contents) is available in any Victoria's Secret stores and online on their website for only USD32.

Until next time!

Saturday, November 17, 2012

Blissful Things #2

November Edition!
Clockwise from top left corner:

1. Egyptian Magic Cream - I recently decided to rein in my spending habit and this cult cream came into play. It merges all my skincare into just one cream. Not everyone might like it, though - it's very thick.

2. Clarisonic Mia - Facial brush, I used to use the manual type back in high school and it worked really well for me. This gadget is very overpriced, though. IMHO, just get the Mia and save a few bucks, no need to get the original one.

3. Fruit Salad ice cream from Wall's - LOVE THIS. Nuff said.

4. Taiwanese street snacks (Image courtesy of I Love Taimei) - I've been on a Taiwanese street snacks kick these lately, especially on the sweet potato fries and the tempura (both with plum seasoning).

5. Versense by Versace - Great for hot and humid weather because the smell is fresh and not cloying.

Homemade Wall Art for Those on a Budget

Look who tried her hands on a little arts & crafts here....me! LOL

So I was taking few days off and took the chance to decorate my bedroom which I've always felt lacking...something.

I bought a couple of cheap frames, thinking I'd frame some Vogue tear sheets I've been collecting over the years. When I got home, though...I got stuck. Then, after couldn't decide what to do for an hour I decided to just wing it; a little folding here, a little glue there...et voila:


I came up with these two! Basically I'm using a folding technique to show random parts of the page and hide the other so it'll have some voyeuristic quality to it, like you get the feeling like you're looking at something familiar and it invites you to look closer and find out.

It can look abstract from afar but upon closer inspection you'd realize it's not so it can be a good conversation piece. You can tell your guests about the actual image and the story behind it.

I don't think this art idea is new but I didn't try to emulate any specific art when I was making these. Funny thing, though, my roommate pointed out there was a similar art in one of Criminal Minds episodes we watched together.

I'm pretty proud of myself, this is a clever way of using those tear sheets that would otherwise be stashed away somewhere in my drawer. It's also worth mentioning that when she first came home, my roommate thought I bought these *smug face* =D

Wednesday, November 14, 2012

Chanel Le Vernis Mimosa : How to Salvage a Wrong Shade of Polish

I bought Chanel Le Vernis in Mimosa back in summer 2011. It is a very pretty yellow, bright and opaque enough to show up on your nails but classy enough not to emulate a teeny bopper. It has very fine shimmery particles but you can't really see them unless you hold the bottle / your nails next to your eyes.

Sadly, the shade is all wrong for me. It got me a bad case of lobster hands and it always looks very painted on. I can't tell you how many times I painted it on only to remove it seconds later. For as long as I've owned the polish, I have yet to wear it in all its glory. It is THAT bad on me. Suffice it to say, Chanel Mimosa is unflattering for my skin tone.

However, there's no reason to waste a perfectly good polish so I came up with a couple of ideas on how to rework Mimosa into something wearable on me.

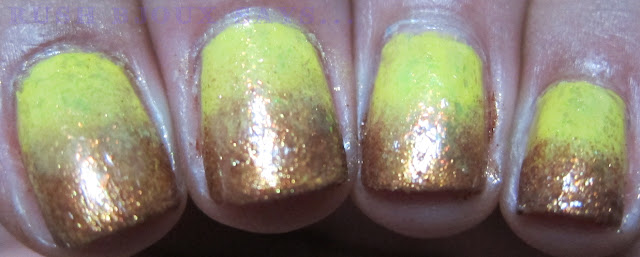
1. Bubbly Mimosa

These bubbly-inspired nails also serve as my first attempt at gradation nails. You know, the one where you use sponge to create (somewhat) seamless gradation of 2 different colors.
 I use China Glaze in Harvest Moon for this effect. Harvest Moon is a gorgeous shimmery copper and part of their Capitol Colors collection (a tie-in with the Hunger Games movie).
 

I still haven't mastered it yet but i think the uneven border makes for a nice bubbly-like effect.

 This will definitely catch people's eyes, perhaps more appropriate for parties and celebrations.


2. Sprinkles nails: Easter Egg Edition
I came up with the second idea after rummaging through my polishes collection and found several colors that looked so great together. I don't know if there's already a name for this effect but I call it 'Sprinkles Nails' because it consists of dots from several different colors - it's basically a 2D version of Ciate's Caviar nails and InStyle magazine actually ran an article of similar idea a few months back.
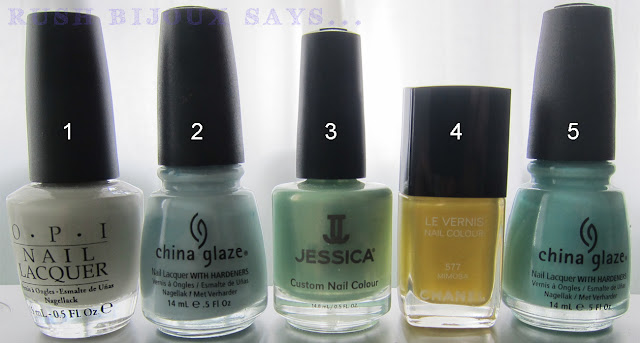
I use 5 different polishes for this effect: 1 for the base color, and the rest for the dots.
From left to right:
1. OPI Skulls & Glossbones as base color
2.China Glaze - Sea Spray
3. Jessica - Cloud Mine
4. Chanel - Mimosa
5. China Glaze - For Audrey

For the record, China Glaze - Sea Spray was the color that started it all for me. Before it came out, I was never such a polish fiend as I am right now. Then it came out and it started snowballing from there =D
Steps 1 - 5
So what you do is, paint your nails with the base color then work your way through each color by dotting it randomly all over your nail, one color at a time. This works best with polishes that have rounded type of brush.


The end result looks somewhat like the colors and pattern you'd use to decorate an Easter egg, hence the name of the design. Definitely eye-catching and not for the boardroom!

The good thing about Sprinkles Nails is that you can experiment with any colors, you can go with themes such as Christmas, Halloween, St. Patrick's Day, etc. or you can just go crazy and mix in any colors, the possibility is endless and each will yield unique result, every time.

Holiday is around the corner so Season's Greetings everyone! ^_^
Tuesday, November 13, 2012

A Shot at Photography

Given my occupation, it's only natural I am attracted to anything arty-fartsy. That, and coupled with appreciation towards what other architects have done to make life a better place, I've pulled up a few of super duper amateurish shots from my collection to share with you here. Why? Because sometimes you just like to look at pretty things =D

I'm keeping the locations/names of the objects so it'll feel more curious, feel free to guess, though...;-p